Create a simple self-hosted webhook with Flask
Host your own simple webhook using Flask, uwsgi and Nginx.

Recently I was playing with the Content-Security-Policy-Report-Only header, to be specific, the report-uri feature. I wondered how organization's usually accept or collect this information. After some quick digging around, I found that people usually make use of 3rd party services such as Report URI to accept report-uri data. Due to privacy concerns, I decided to create my own listener, a webhook. The webhook can work for this case by just running it directly but I went with a better practice by running through a more production-oriented service such as uWSGI then putting it behind a web server that is more suited to face external traffic (Nginx). You can find the files on my GitHub.
The webhook accepts POST requests with JSON data that is less than 500 bytes. The data including the HTTP headers are then written directly to a text file on the file system. You can just modify it to fit your own needs or requirements.
Screenshots

Instructions:
Prerequisites:
sudo apt-get install python3 python3-pip uwsgi uwsgi-plugin-python3 nginx
pip3 install flaskDownload the folder from my GitHub repository:
To test the Python script alone: python3 webhook_flask.py. At the bottom of the script, you can uncomment the line to select the listening IP, Port, and debug flag. This is for dev or testing purposes only.
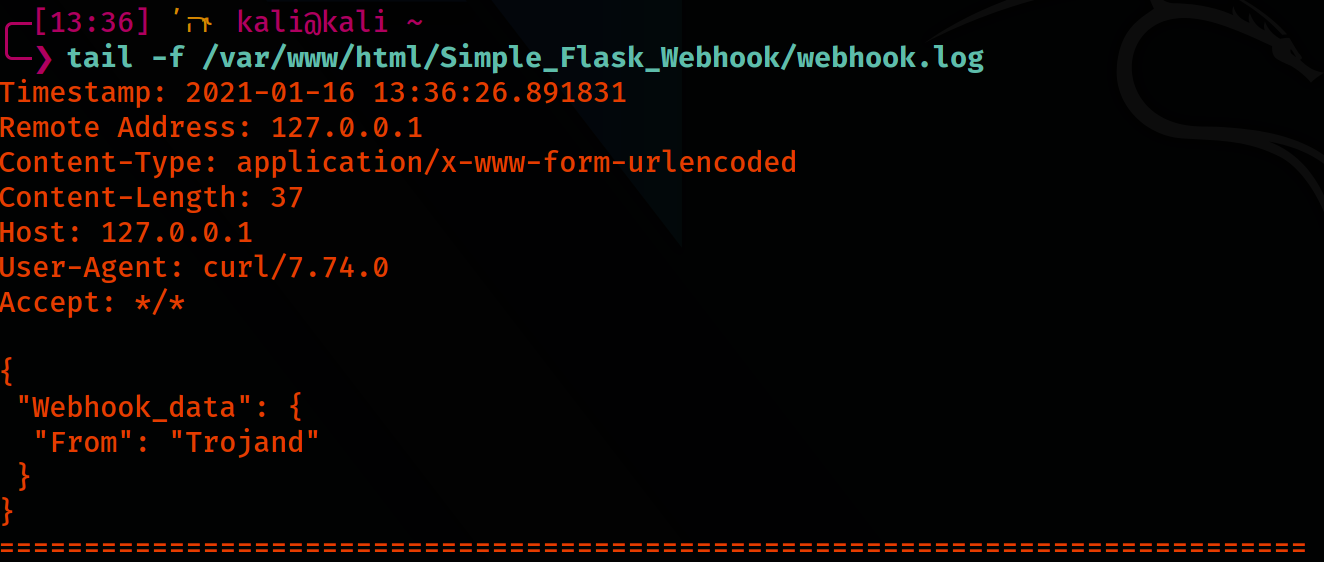
curl -X POST http://127.0.0.1:29999/webhook --data "{ \"Webhook_data\": {\"From\":\"Trojand\"}}"Execute below for testing with uWSGI:
uwsgi webhook_uwsgi.iniUpon running netstat -plunt you should notice a new listening service. Unmodified, you should see 127.0.0.1:29999.
To run on startup, we will make use of the uWSGI service.
Copy the webhook_uwsgi.ini to the uwsgi apps-available folder and create a symlink to the apps-enabled folder:
sudo cp webhook_uwsgi.ini /etc/uwsgi/apps-available
sudo ln -s /etc/uwsgi/apps-available/webhook_uwsgi.ini /etc/uwsgi/apps-enabled/webhook_uwsgi.ini
Important: In the copied webhook_uwsgi.ini file, make sure to modify and update the path of the webhook_flask.py
Start and enable the uWSGI service:
sudo systemctl restart uwsgi
sudo systemctl enable uwsgi
Add the code block below to your Nginx configuration file.
location /webhook {
    include uwsgi_params;
    uwsgi_pass 127.0.0.1:29999;
}Restart and enable Nginx
sudo systemctl restart nginx
sudo systemctl enable nginx
Lastly, since the webhook_uwsgi.ini is running on the user www-data, change the owner of the webhook.log to www-data. Unmodified, the webhook.log file should be in the same folder as the webhook_flask.py
sudo chown www-data:www-data webhook.logQuick install commands
sudo apt-get install python3 python3-pip uwsgi uwsgi-plugin-python3 nginx
pip3 install flask
mkdir -p /var/www/html
cd /var/www/html
sudo git clone https://github.com/trojand/Simple_Flask_Webhook
cd Simple_Flask_Webhook
sudo sed -i.bak "s|\.\/webhook_flask\.py|$pwd\/webhook_flask\.py|g" webhook_uwsgi.ini
sudo cp webhook_uwsgi.ini /etc/uwsgi/apps-available
sudo ln -s /etc/uwsgi/apps-available/webhook_uwsgi.ini /etc/uwsgi/apps-enabled/webhook_uwsgi.ini
sudo touch webhook.log
sudo chown www-data:www-data webhook.log
sudo systemctl restart uwsgi
sudo systemctl enable uwsgi
Insert below block to your Nginx configuration
location /webhook {
    include uwsgi_params;
    uwsgi_pass 127.0.0.1:29999;
}sudo systemctl restart nginx
sudo systemctl enable nginxTest commands:
tail -f /var/www/html/Simple_Flask_Webhook/webhook.logcurl -X POST http://127.0.0.1:<PORT>/webhook --data "{ \"Webhook_data\": {\"From\":\"Trojand\"}}"Sources:
- uWSGI - Quick start
- Hackers and Slackers - Deploy Flask Applications with uWSGI and Nginx
- Mozilla - Content-Security-Policy-Report-Only
Comments and suggestions are welcome in the comment section.