Nested Tor Gateways using pfSense
A guide on how to make nested Tor Tunnels via pfSense as gateway.

I am writing this guide in an attempt to help newbie technical people or possibly people in general in setting up nested Tor Tunnels for extra privacy, protection and/or anonymity.
BACKSTORY:
I was curious if it was possible to have nested Tor connections and tried to search for a guide that will help me implement this but I was not able to find one (or I was not looking hard enough). So I decided to make one.
IN CASE YOU DON'T KNOW:
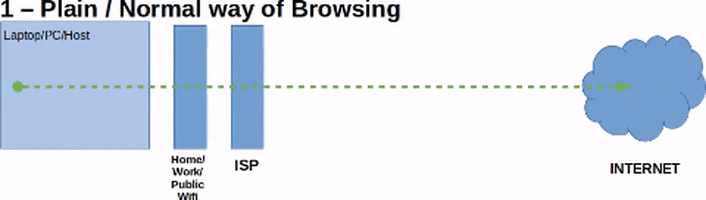
There are multiple ways or scenarios in which third party organizations and/or malicious actors can de-anonymize a person when using Tor. Some examples range from the unintentional exposure of information such as background applications running on the host, users forgetting to turn on Tor/VPN, DNS leaks, accidental disconnection of Tor/VPN to intentional mass or targeted poisoned Tor Relays, ultrasound tracking, timing attacks, etc. Due to the recent news about Tor users being tracked down or de-anonymized by state actors and other Third-party organizations or contractors, some percentage of Tor users had become discouraged, hesitant, or had some sort of doubt in using Tor knowing that their privacy can be compromised.
What this will help fix:
Below are more scenarios in which you can be tracked or de-anonymized when using Tor Browser or Tor application on your host:
-
Background services: Background services running on your Host or Operating System. Traffic coming from these services may not pass through the Tor tunnel or Browser which may directly reveal your real IP address, location, identity or may simply send out traffic which later may be correlated and used to track you. Examples of these are:
- Operating System and/or application updates
- Proprietary, legitimate and/or malicious applications contacting company or C&C server for license verification, usage statistics and such.
-
System Compromise: If such parties are trying to track you, they may attempt to compromise your system through known or zero day vulnerabilities on the Tor Browser or by simply sending out phishing messages or emails which may contain malicious files or payloads. Once your system is compromised, the attacker may try to bypass the Tor Application Tunnel or Tor Browser and send traffic back to the attacker controlled server therefore revealing your real IP address and possibly your accurate location and/or identity.
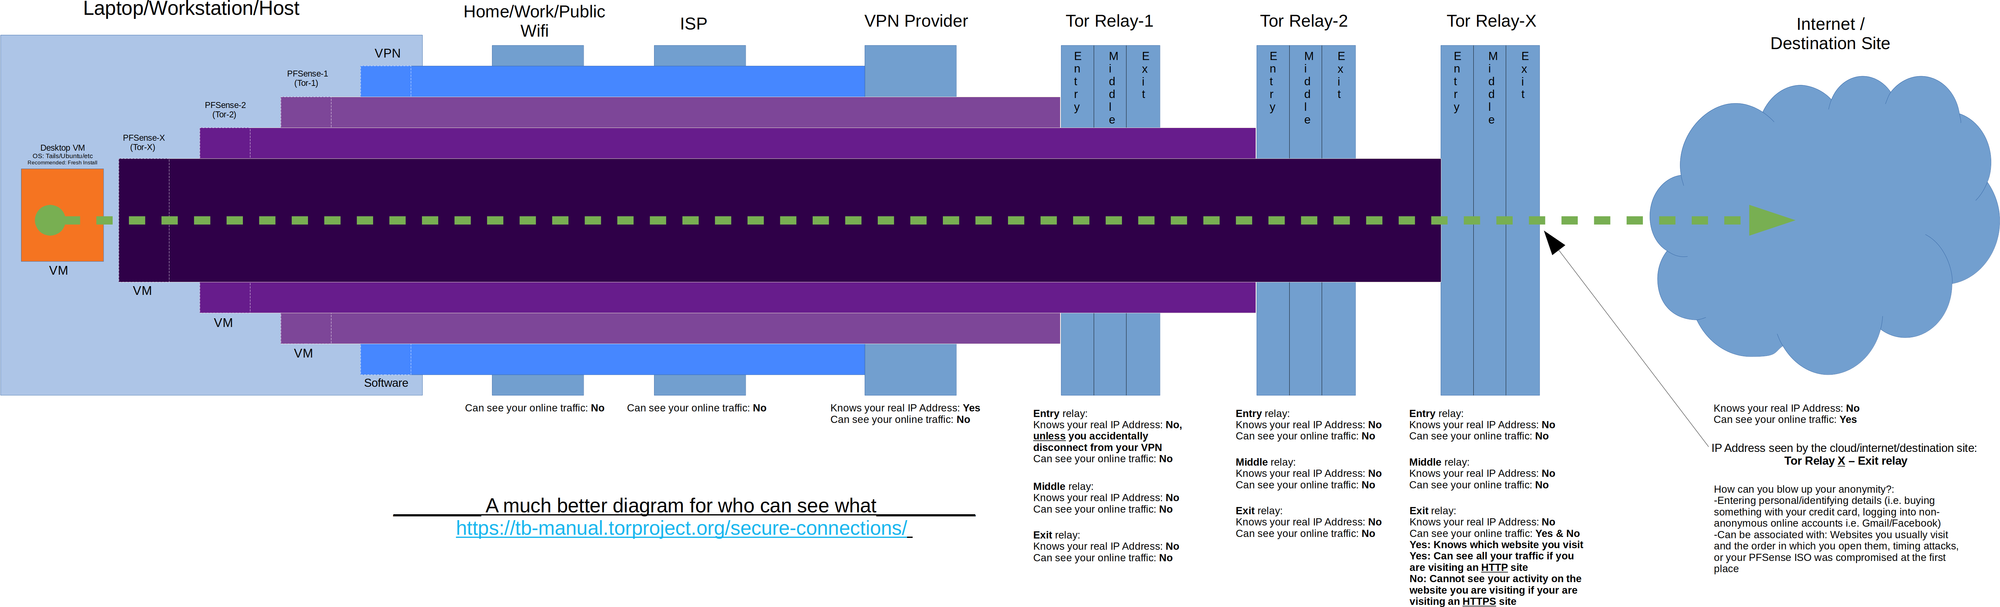
The advantages of using a Tor connected Firewall as your Guest OS VM's gateway is that the traffic on your Guest VM that is not passing through the Tor application or Tor Browser installed or running on your Guest VM's OS itself has no choice but to only pass through the Tor-enabled gateway. Again. Basically, EVERY traffic coming from your Guest VM/OS should be coming out to the internet through the Tor Exit Nodes therefore concealing your real public IP Address.
Tor & Firewalls:
The backbone of this guide is the "Implementation of Tor on a pfSense firewall/router" which I followed here and here. These posts/guides are not up-to-date and I thought of making an updated one myself however upon writing this, I found that this guy already nailed it therefore this guide will be shorter than intended and will concentrate on the nested Tor Connections for multiple layers of Tor Tunnels.
Overview of the setup:
This guide will using using pfSense 2.4.4 which is basically FreeBSD 11.2. Also this guide's aim is to utilize a VPN software installed on the host to create the first or outer most layer of the network tunnels. A Tor-enabled pfSense Firewall VM (pfSense-Tor-1) will be connecting to the Internet via a NAT connection to utilize the first layer/level of protection that the VPN creates. Then, a second Tor-enabled pfSense Firewall VM (pfSense-Tor-2) will connect to the LAN network of pfSense-Tor-1 to utilize pfSense-Tor-1's Tor connection or tunnel. After that, we will then connect the Guest VM to the LAN network of pfSense-Tor-2 to make use of pfSense-Tor-2's Tor connection or tunnel.
Diagrams are shown below to make it easier to visualize:
What this guide won't do:
- Discuss and recommend which VPN providers are safe or do not keep logs. I just assume all VPN providers do keep logs, it's better this way.
- Tor
- What is Tor and how it works
- Discuss Tor nodes (Entry, Middle, Exit)
- Ethical usage of Tor and how to properly use it
- Teach you how to install:
- Desktop Virtualization Software
- Your Guest VMs OS (any Linux, Windows, etc.) (see Tails)
- This includes pfSense
- Tor Browser
- What's good and bad
DISCLAIMER:
- I am not associated with the Tor team or any VPN provider.
- I am not liable for your actions.
- If you will be risking a lot (i.e. your life) depending on this guide, don't. Do research on other stuff then vet this procedure. Consider this guide as a mere suggestion.
Prerequisites:
- Basic Knowledge on
- What is Tor and how it works
- Virtualization
- Networking
- Installed:
- VPN
- VPN software that is installed on your desktop/laptop not the Browser plugin type
- What VPN to choose or is safe is not part of this guide
- VPN software that is installed on your desktop/laptop not the Browser plugin type
- Desktop Virtualization Software
- Oracle VirtualBox (You could use VMware Player/Workstation/Fusion or other Hypervisors if you wish)
- Working pfSense VM that is connected to Tor (see this guide)
- Guest VM (Any OS, however, Linux is highly recommended. Also, I strongly vouch for Tails OS if you are going to do something that involves high risk)
- VPN
Lets Start!
What I'm expecting you to have at this point is:
- Installed on your Laptop/PC/Host OS:
- VPN Software
- preferably with a kill switch function enabled
- VPN Software
- Installed on your Desktop Virtualization Software:
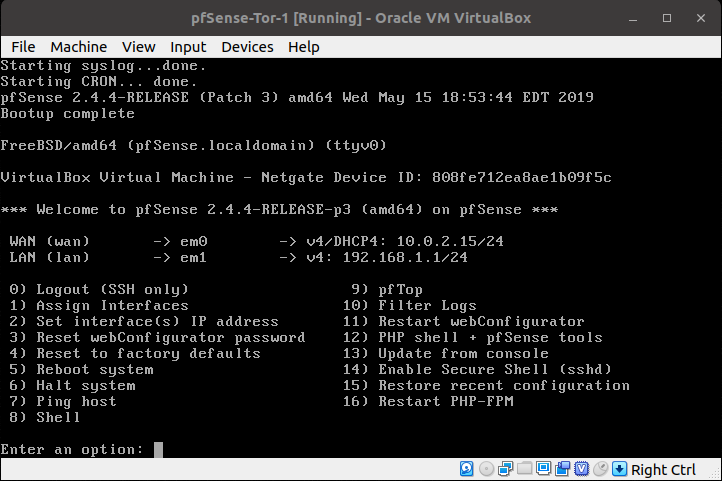
- One (1) pfSense VM with Tor enabled (from which you would have installed using this guide), proper setup includes:
- Access to the WebUI from the WAN interface
- If you are having trouble accessing the pfSense WebUI from the script of the guide I referred, you could use your Guest VM change or connect it to the LAN network of the first pfSense VM(pfSense-Tor-1), set a static IP address (i.e. 192.168.1.2) and access the pfSense VM's WebUI from its LAN (192.168.1.1).
- Access to the WebUI from the WAN interface
- One (1) pfSense VM with Tor enabled (from which you would have installed using this guide), proper setup includes:
- A Guest OS VM (in this guide's case Tails OS in which you could install using this guide)
- Make sure it can connect to Tor network using a normal browser first and not yet using the Tor Browser)
From the referred guide on how setup the Tor enabled pfSense VM, we need to change a few things first:
- pfSense-Tor-1 Setup
- Rename Internal Network for easier management or identification

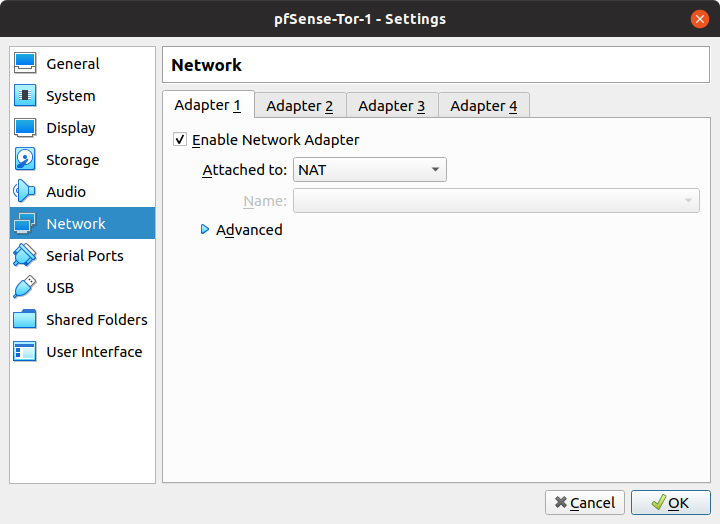
- Change the first Network interface from Bridge to NAT. This is so that we could make use of the VPN tunnel on the Host OS
- Remove the rules allowing all types of traffic to pass through. Replace it with rules which are only allowing
- HTTP traffic

- HTTPS traffic
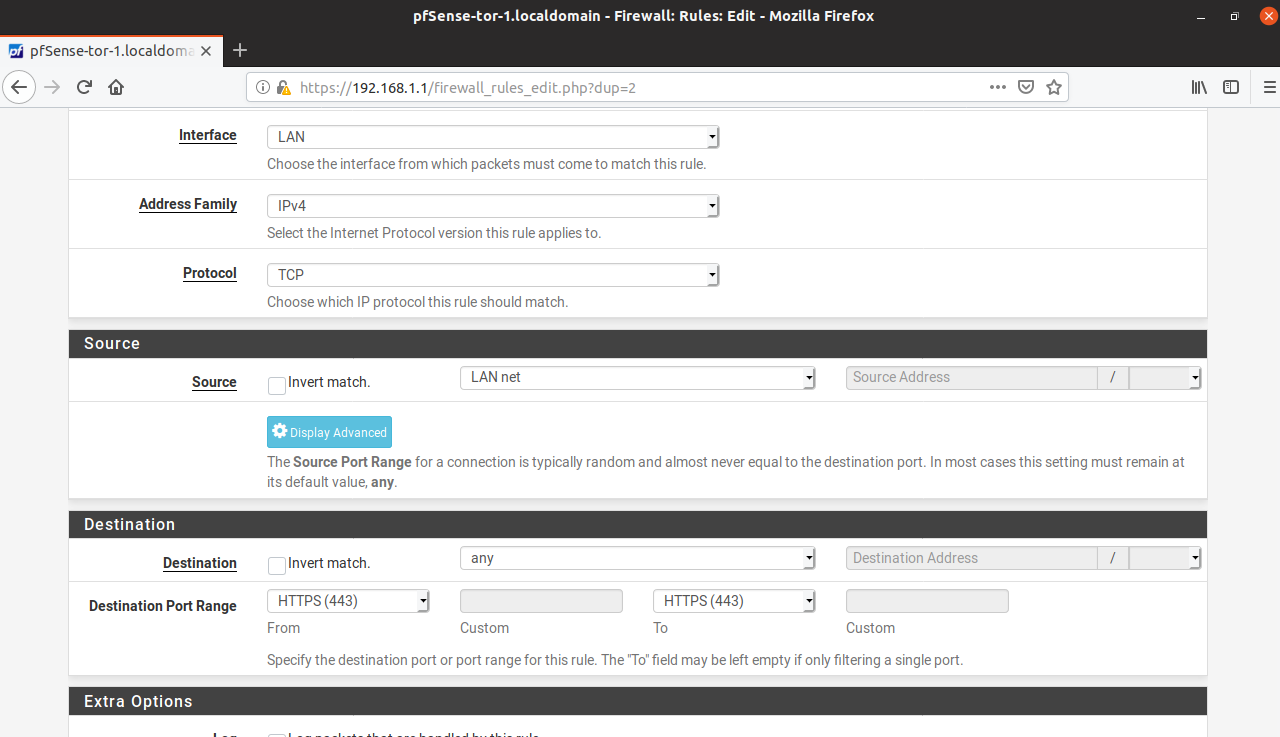
- This is what it should look like:
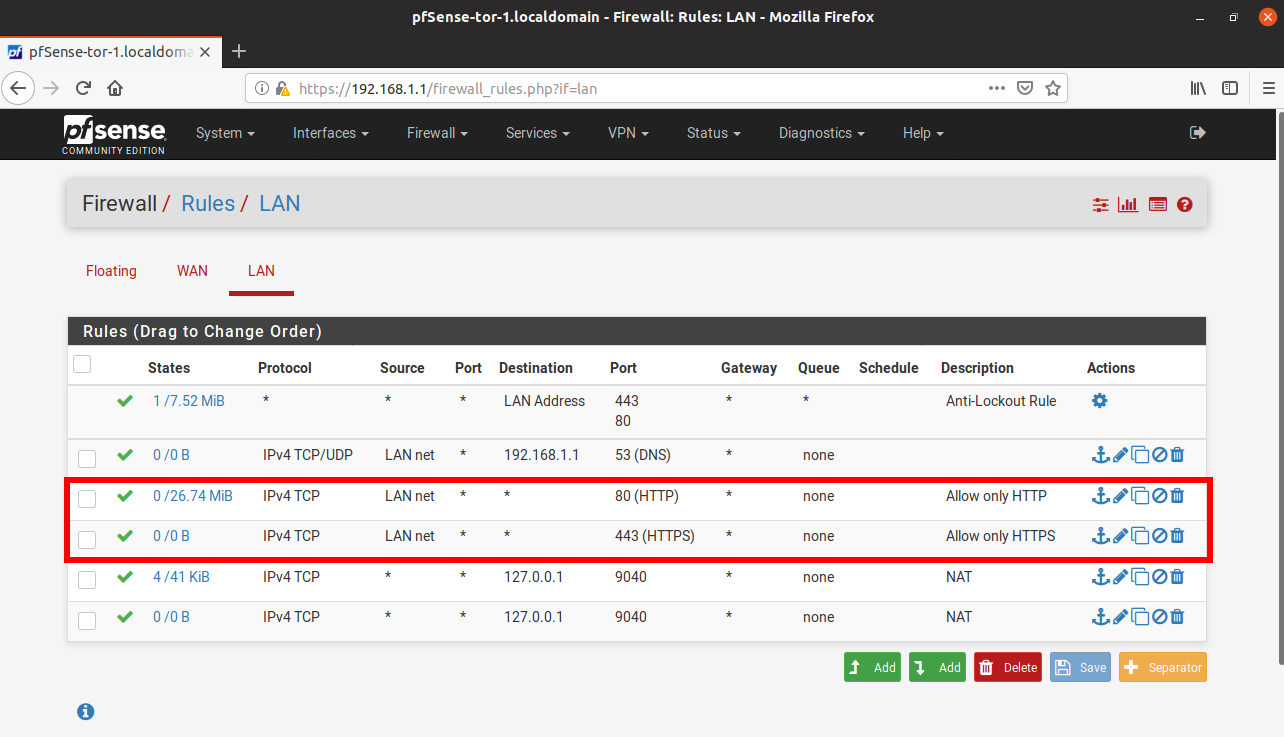
- HTTP traffic
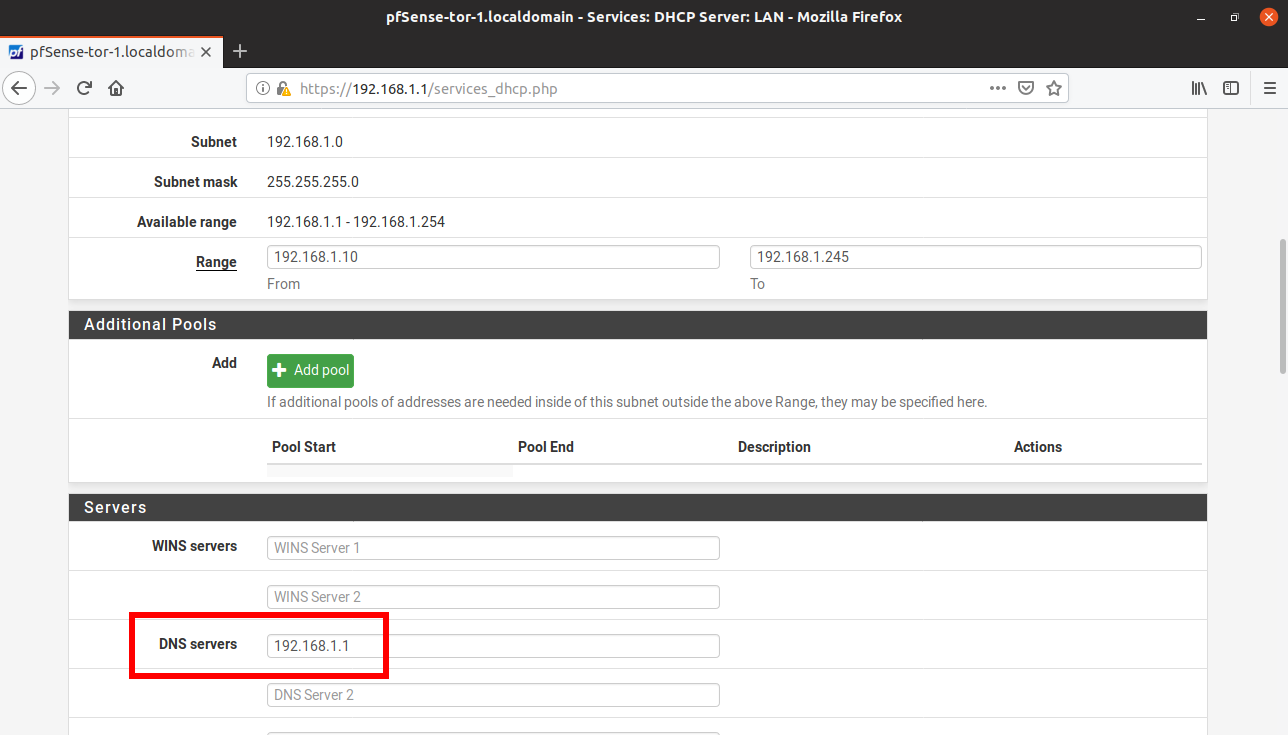
- On the Services->DHCP Server->DNS Servers, add the LAN IP address of the pfSense-Tor VM (in this case 192.168.1.1)
- Rename Internal Network for easier management or identification
- Guest OS VM
- Change the network interface to the newly named Internal Network of the pfSense-Tor VM (pfSense-Tor-1)

- Change the network interface to the newly named Internal Network of the pfSense-Tor VM (pfSense-Tor-1)
At this point you should be behind the Tor-utilizing Gateway and therefore have a discrete layer of anonymity.
Presenting...
EXTRA ANONYMITY!
Welcome to the main part of the guide. Here we will clone our working Tor-enabled pfSense VM (pfSense-Tor-1).
- Shutdown the first pfSense VM (pfSense-Tor-1)
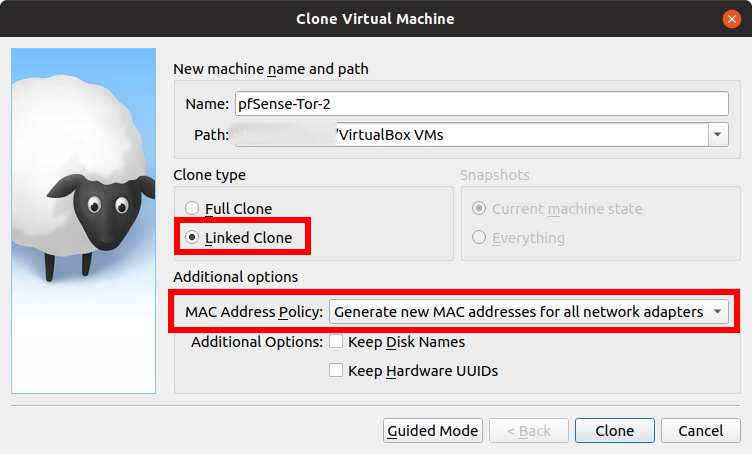
- Now on your VirtualBox Management Window, right click on the pfSense VM and click Clone
- Name your cloned pfSense VM similar to the first one and increment the number, in this case, this is the second pfSense VM therefore it is "pfSense-Tor-2"
- Choose Linked Clone for the Clone type
- Important! Make sure to choose "Generate New MAC Addresses for all network adapters". We don't want to have conflicting MAC addresses.
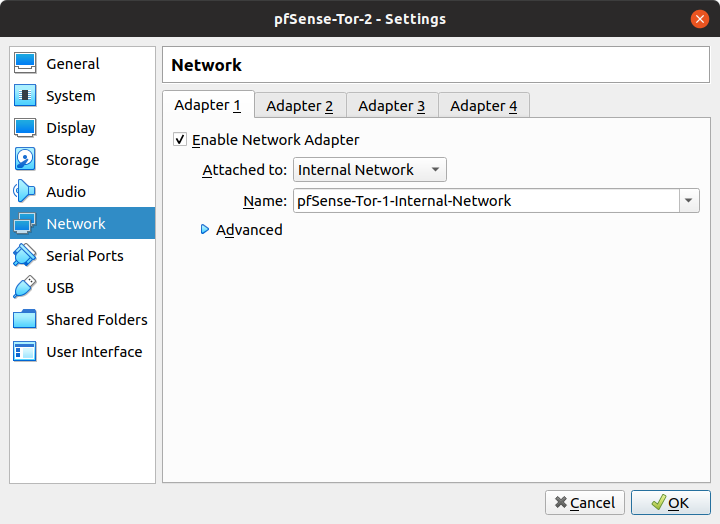
- Edit the Network of the newly cloned pfSense VM (pfSense-Tor-2). Change the Adapter 1 to the Internal Network of pfSense-Tor-1 by clicking the drop-down menu and choosing "pfSense-Tor-1-Internal-Network".
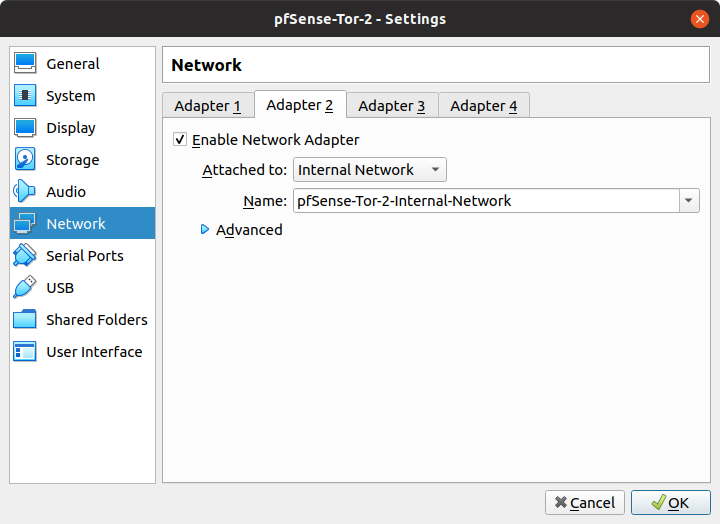
- Change the name of Adapter 2 to "pfSense-Tor-2-Internal-Network" in order to create pfSense-Tor-2's own internal network.
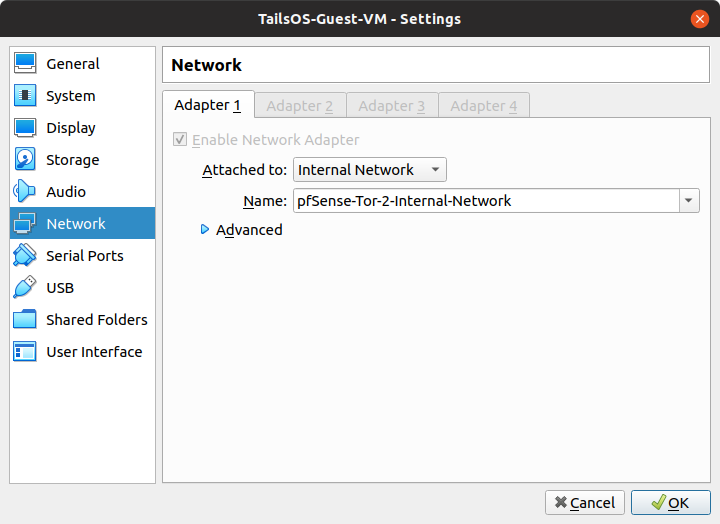
- Change the network settings of the Guest VM to "pfSense-Tor-2-Internal-Network" so that the GuestVM will go through pfSense-Tor-2's tunnel.
- Start or Power-up pfSense-Tor-1 and wait for around 15 seconds before powering up pfSense-Tor-2 VM. This is so that pfSense-Tor-1 VM can have its DHCP server ready which will be used by pfSense-Tor-2's WAN interface to get an IP address.
Recap, pfSense-Tor-1's LAN interface IP address is 192.168.1.1 with DHCP services enabled, therefore, the WAN interface of pfSense-Tor-2 will receive an IP address within the 192.168.1.x network. Since pfSense-Tor-2 is a clone of pfSense-Tor-1, pfSense-Tor-2's LAN interface is also in the 192.168.1.x network.
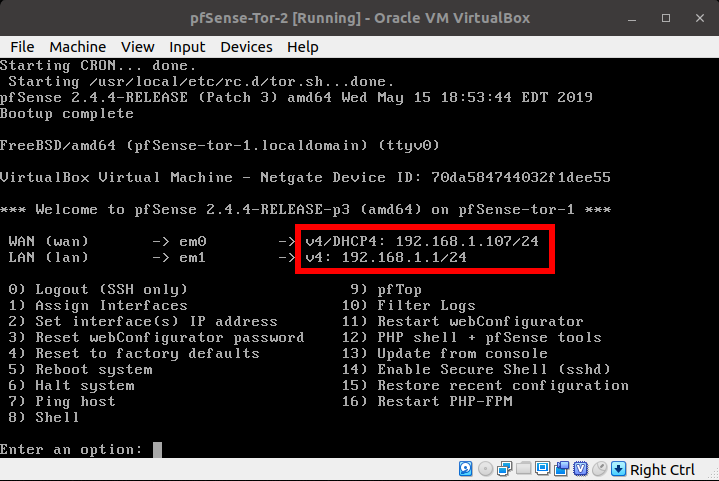
This is a big NO NO in principles of computer networking. To resolve this, we will manually set the IP address of the LAN interface of pfSense-Tor-2.
Go the pfSense-Tor-2's VirtualBox window. Enter the following:
- 2 - (Set interface(s) IP Address)
- 2 - (LAN (em1 - static)
- 192.168.2.1 - for the "Enter the new LAN IPv4 address". We incremented the third octet by one to match the number of our pfSense-Tor-#
- 24 - for the LAN IPv4 subnet bit count
- <ENTER> - for none
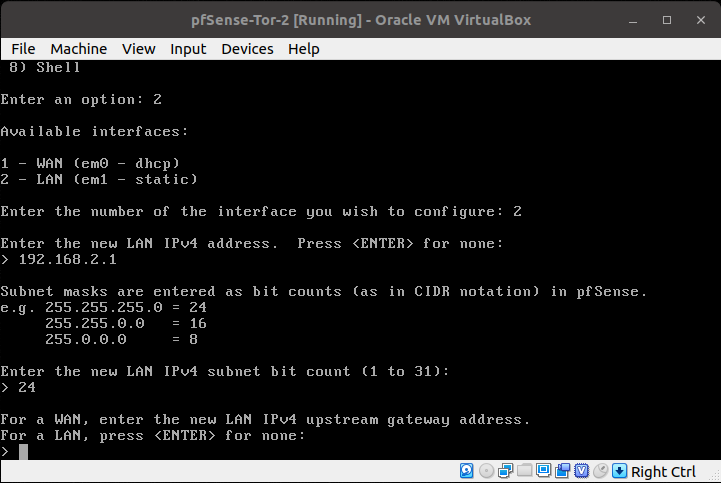
- <ENTER> - no need for LAN IPv6 address.
- y - Enable DHCP server on LAN
- 192.168.2.100 - Start address of the IPv4 client address range
- 192.168.2.200 - End address of the IPv4 client address range
- n - no need to revert to HTTP as the webConfigurator protocol
- <ENTER>
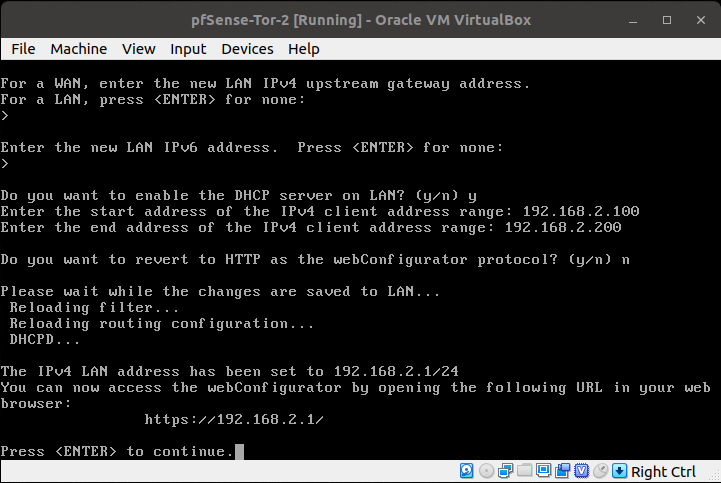
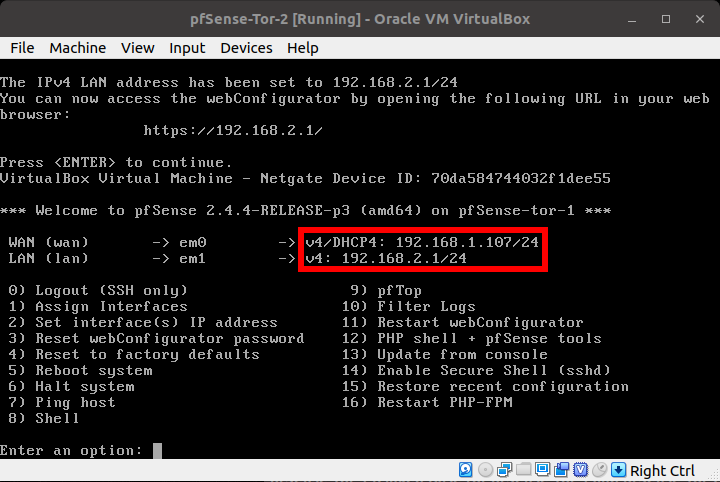
It should now look like this:
Nearly there!
Your Guest VM should now be able to access the WebUI of pfSense-Tor-2.
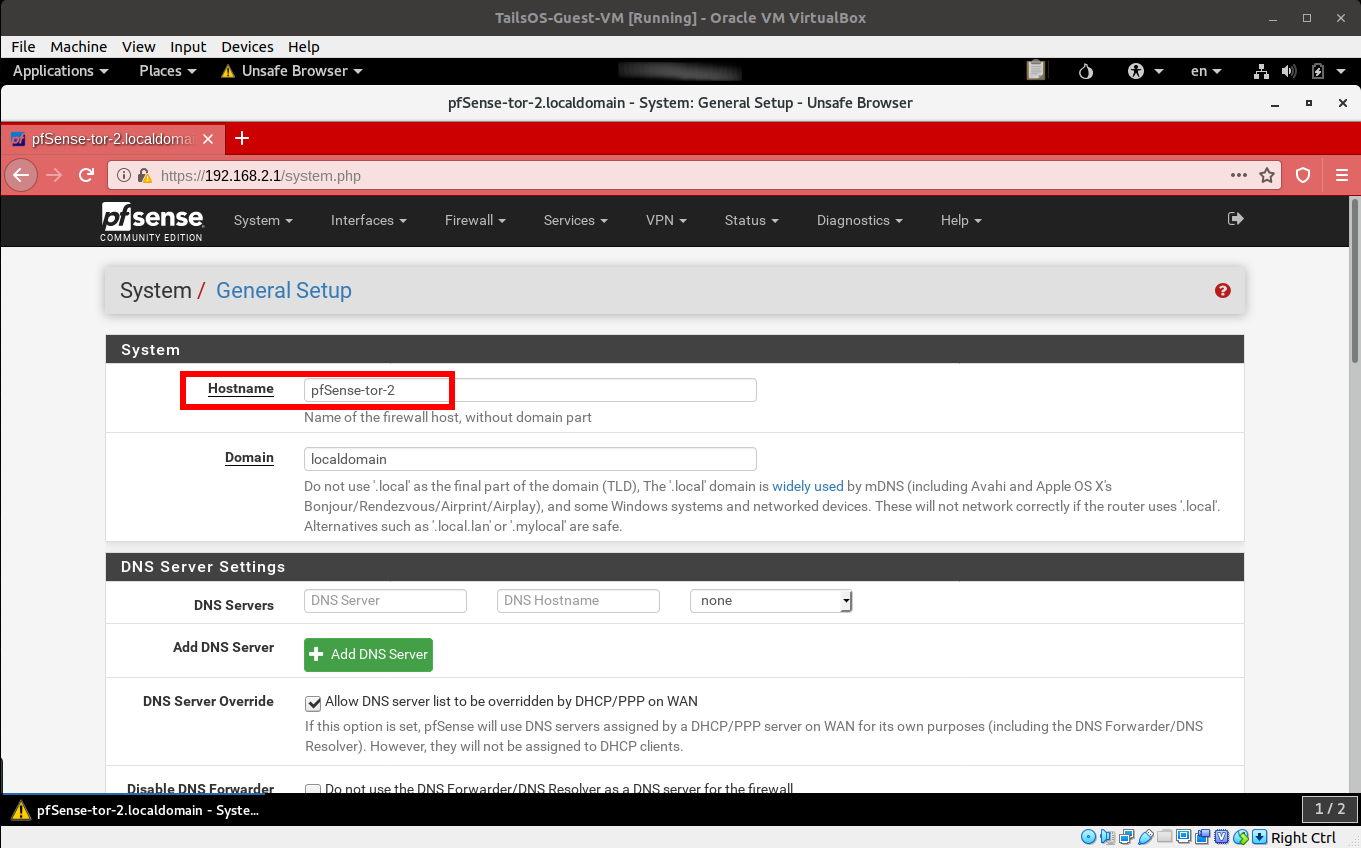
- In the System->General Setup->Hostname, change the value to reflect the pfSense-Tor-VM# that you are at, in this case it is pfSense-Tor-2
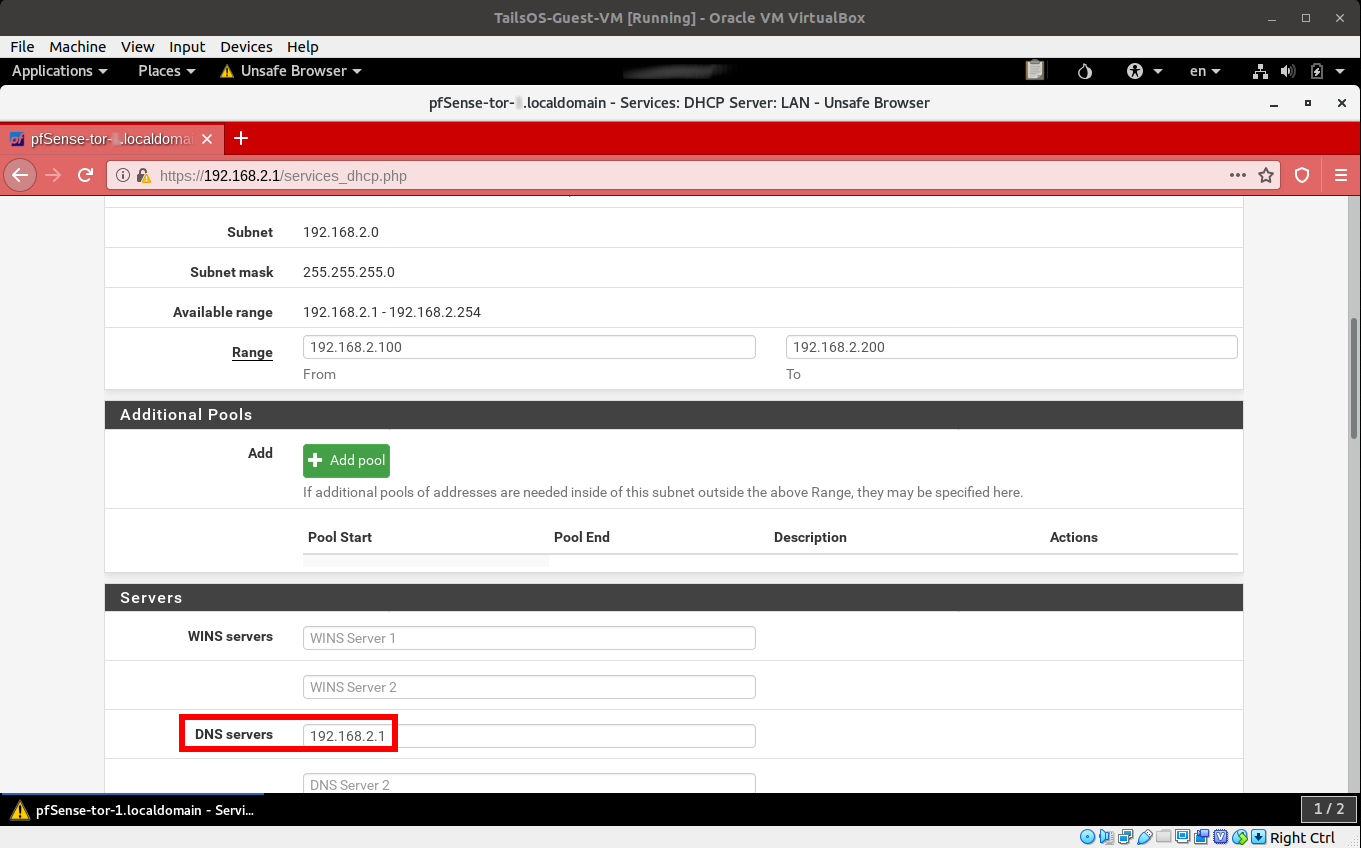
- In the Services->DHCP Server->DNS Servers, change to reflect the LAN IP address of the current pfSense-Tor VM (in this case 192.168.2.1)
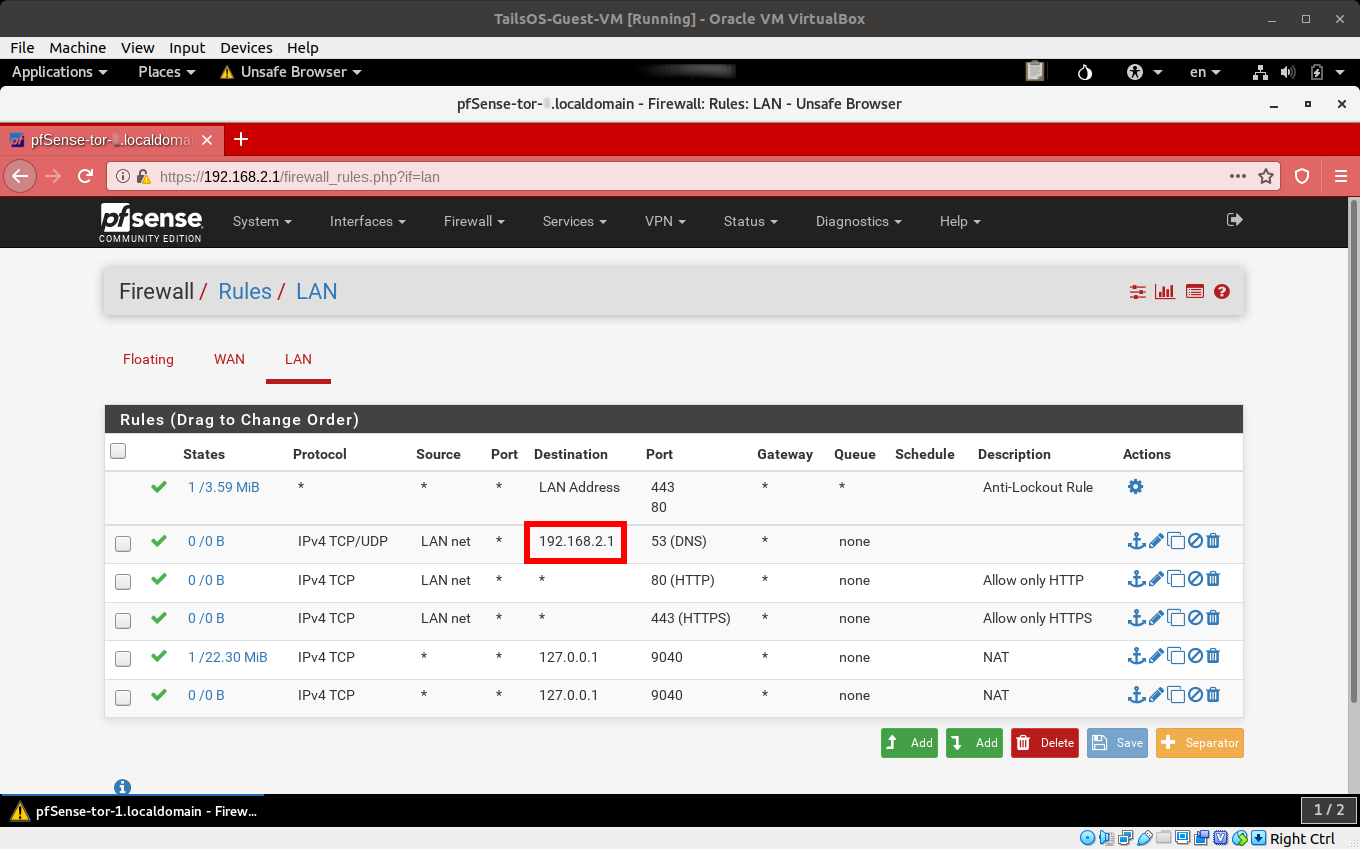
- In the Firewall->Rules->LAN, look for the Rules that allows DNS traffic (TCP/UDP Port 53) to go to the LAN IP Address of the VM, since we just cloned this VM from pfSense-Tor-1, the value you are looking for is 192.168.1.1 which should be changed to 192.168.2.1
Congratulations!!! You should be have a nested connection to the Tor Network.
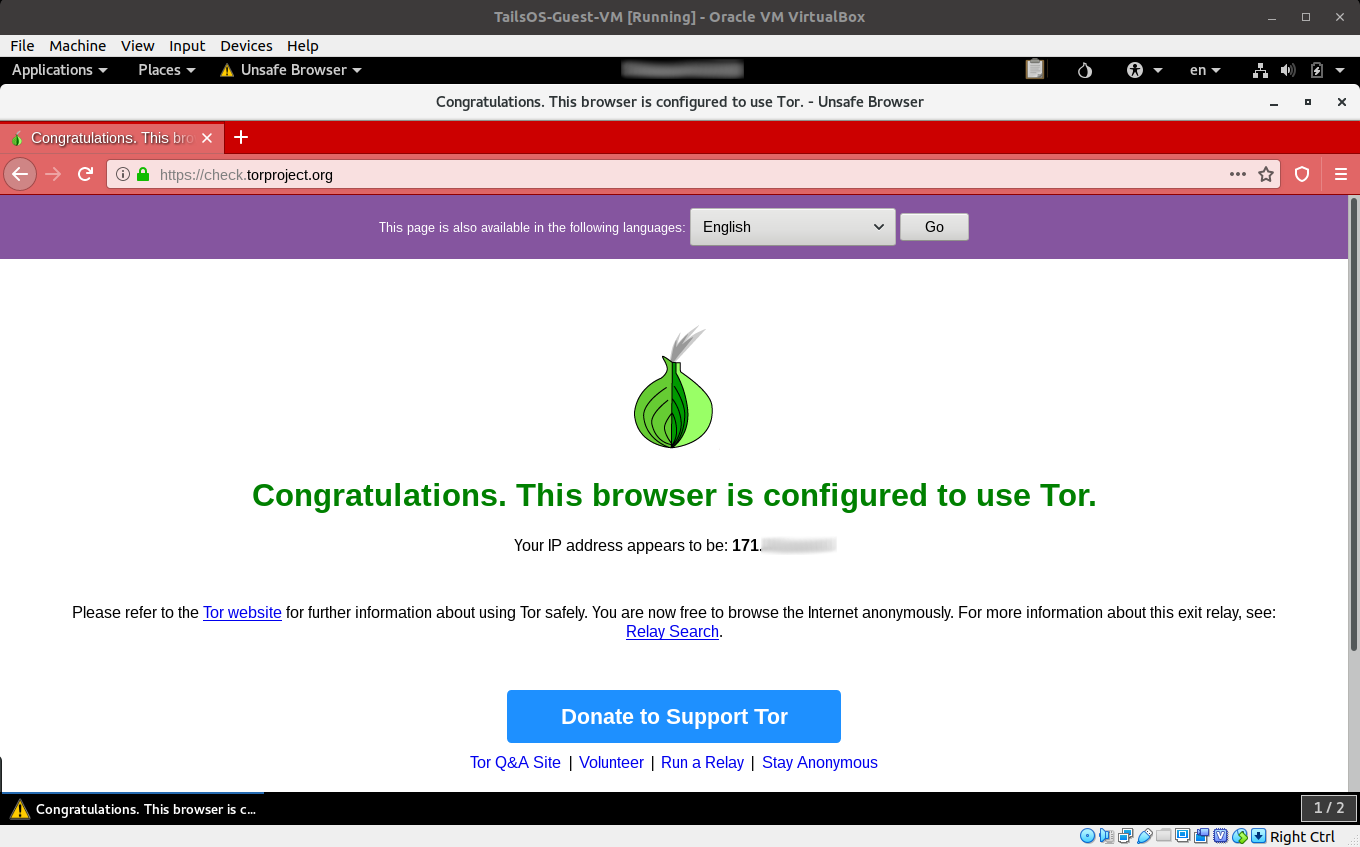
Open your normal browser (not the Tor Browser yet) in your Guest VM and proceed to https://check.torproject.org.
If Tor has validated that you are using a Tor connection, you should now check if you truly are nested.
To do that, we will:
- Connect the Guest VM's network back to pfSense-Tor-1's internal network.
- Reset your Guest VM's network interface, DHCP service or simply reboot the VM to get an IP address from pfSense-Tor-1's LAN subnet/network.
- Open your normal browser in your Guest VM and proceed to https://check.torproject.org or some other sites that shows you your public IP Address.
- Note the IP Address down
- Connect the Guest VM's network back to pfSense-Tor-2's internal network.
- Reset your Guest VM's network interface, DHCP service or simply reboot the VM to get an IP address from pfSense-Tor-2's LAN subnet/network.
- Open your normal browser in your Guest VM and proceed to https://check.torproject.org or some other sites that tells your public IP Address.
- The IP Address should be different.
Also, remember that this guide's setup utilizes a VPN software on your host. If you do have one setup and running, you can perform an additional check by:
- Changing the Guest VM's network interface to NAT.
- Reset your Guest VM's network interface, DHCP service or simply reboot the VM to get an IP address from VirtualBox NAT subnet/network.
- Open your normal browser in your Guest VM and proceed to https://check.torproject.org or some other sites that shows you your public IP Address.
- Note that the IP Address should be your VPN providers IP address and the Tor check page should tell you that you are not connected to the Tor Network.
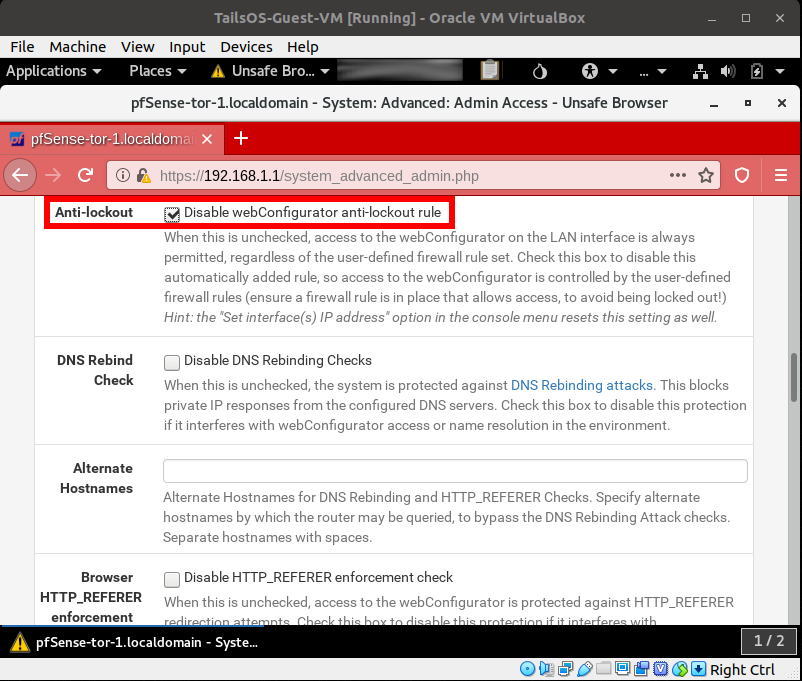
Finally, I recommend turning off the WebUI access to the LAN side of the pfSense-Tor VMs. This is so that if the Guest VM is compromised, the attacker will not be able to break or crawl its way out to the Host OS through the WebUI/management service on the LAN interface of the pfSense VMs. Before doing this, I recommend that you make sure that the pfSense-Tor VMs WebUI can be accessible from the WAN side or that you have another clone of the pfSense VM that is just switched off and used for backup.
EXTRA ANONYMITY!!
Repeat the steps on the previous section ("EXTRA ANONYMITY" [pfSense-Tor-2]) until you are satisfied and/or have eliminated your paranoia.
EXTRA ANONYMITY!!!
If you have done all the steps above and will be using a browser for your activities, you can add "another" layer of protection by using the Tor Browser inside your Guest VM (i.e. Tails OS in this case)
IMPORTANT:
There is a negative impact or downside to this approach. The amount of bandwidth in Tor that you are consuming may be multiplied by the number of nested layers you have or implemented. For example, you consume 100 KBps of traffic on the Tor network, if you have 3 Nested Tor pfSense VMs then you will be consuming a total of 300 KBps + overhead traffic on the overall Tor network infrastructure.
If you are just looking for basic privacy and protection from prying eyes, you could simply use a Tor Browser or 1 Tor-enabled pfSense VM as your Tor Gateway, else, leave the bandwidth for the people that really need it, you know what I mean. Together or in addition to this, kindly help and contribute by getting involved or by donating to the Tor Project.
How this setup is still not fully safe:
- Well besides a lot more unknown factors, if the attacker who will be able to compromise your Guest OS VM can exploit a VM escape vulnerability, the attacker may be able to execute code on your Host OS, turning off the VPN and revealing your real IP address or even going through the files on your Host OS and sending it back to the attacker controlled server. It does not happen everyday but it is certainly possible.
Credits:
- Post Cover Photo by Anthony DeRosa from Pexels